Smith & Warren has been proudly manufacturing badges in the United States since 1925. Every badge is manufactured in a technologically advanced secure facility located in White Plains, New York. Badges generally take about four weeks to produce. We often get asked why this is, so we're sharing with you a step-by-step process of how each badge is made. All Smith & Warren badges are hand-crafted, of the highest-quality and come with a lifetime warranty, which makes the wait well worth it.
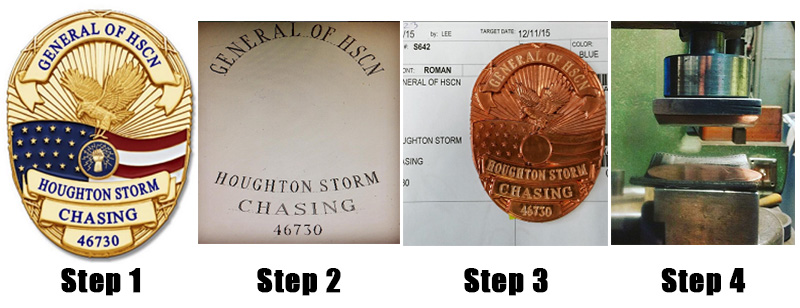
STEP 1: First, the customer customizes their badge using our Badge Builder and sees a digital preview of how their badge will look.
STEP 2: Next comes the engraving layout. This is done on state of the art CNC equipment by highly trained personnel.
STEP 3: Once the layout is complete, the badge is physically engraved using the CNC machine.
STEP 4: The next step is "dapping," where the badge is curved. All badges start off flat, but are curved or semi-curved when requested.
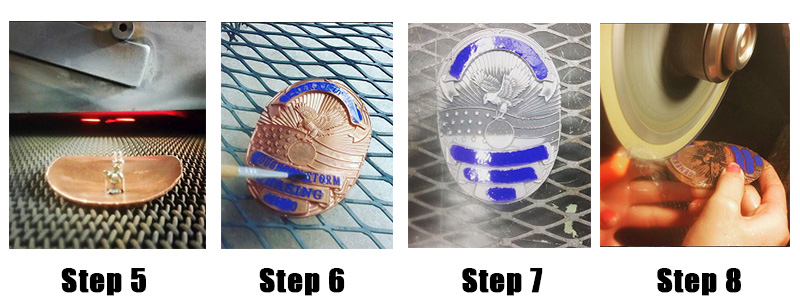
STEP 5: Next, the customer's chosen attachment is applied by hand to the back of the badge. It is then fired in an oven at over 1500 degrees to melt the solder and permanently bond the attachment to the body of the badge.
STEP 6: The enamel is then painted on by hand in the customer's chosen color. In this example, the customer chose the Hard Enamel (smooth to the touch).
STEP 7: Next, the badge is put into an oven at over 1200 degrees, which melts the enamel to fill the letters. This process is repeated several times to fully fill the engraving.
STEP 8: The enamel is then ground down on a stoning wheel to even and smooth out the letters on the badge.
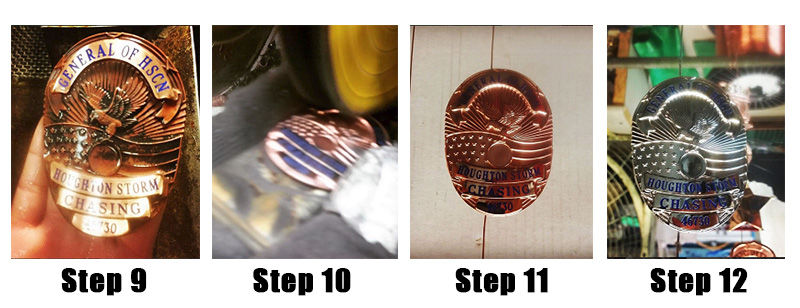
STEP 9: Here, the newly-filled and ground-down letters are revealed.
STEP 10: Next, the badge is polished by hand (with thousands of models, there isn't a machine that can properly polish all of the unique angles of each badge model, so hand polishing is required).
STEP 11: After polishing, the badge is strung up to get ready for electroplating.
STEP 12: The badge is then electroplated with a hard nickel, which protects the base metal and provides a shiny base for the next coat.
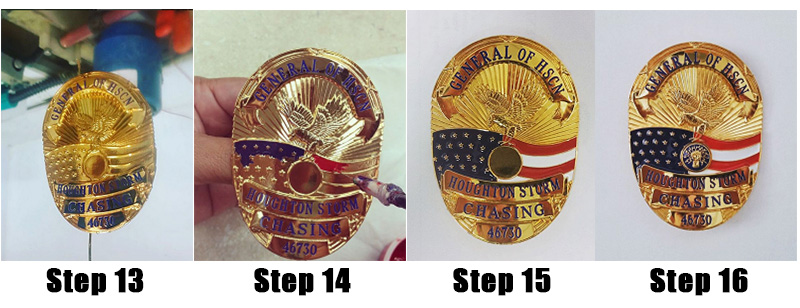
STEP 13: Next, the Gold Electroplate (the customer's chosen finish) layer is applied to the badge.
STEP 14: If the badge has color enamel on it, it is then painted on by hand.
STEP 15: The badge is now almost done! All it needs is the center seal.
STEP 16: With the center seal now applied, the badge is complete!
Once all steps are complete, the badge is then sent to the Quality Control Department where it is inspected by hand by highly-skilled personnel. Then, it is sent to be packaged and shipped directly from the factory to the customer.
For more badge photos, follow Smith & Warren on Instagram: @smithwarrenbadges